
Best Tips on How to Fix a Leaking Toilet
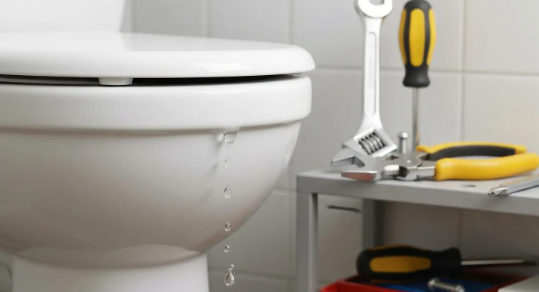
Leaking toilets waste thousands of gallons of water each year and can silently drive up your utility bills while damaging floors and subfloors. In this guide, Mitchel Plumbing and Gas combines expert diagnostics, step-by-step DIY repair methods, cost insights, and professional thresholds to help homeowners stop leaks fast. You’ll learn the most common causes, effective leak detection techniques, flapper and fill valve fixes, wax ring and supply line repairs, budget planning, when to call our certified plumbers, and maintenance tips to extend your toilet’s lifespan.
What Are the Most Common Causes of a Leaking Toilet?
A leaking toilet occurs when water escapes beyond its intended path due to worn or misaligned components, leading to water waste and potential property damage. Common culprits include deteriorated seals, corroded fittings, and cracked supply lines that compromise the tank-to-bowl or base connection. Understanding these root causes prepares you to choose the right repair strategy for lasting results.
How Does a Worn Flapper Valve Cause Toilet Leaks?
A worn flapper valve fails to seal the flush valve seat, allowing tank water to flow continuously into the bowl. Over time, the rubber material becomes warped or cracked, losing elasticity and creating gaps. This constant leakage triggers phantom flushes and can waste up to 200 gallons daily.
Why Is a Faulty Fill Valve Responsible for Running Toilets?
A faulty fill valve stays open after flushing, causing the tank to refill repeatedly. Damaged float mechanisms or internal diaphragm failures misread water levels. Continuous trickle from the fill valve dramatically increases water usage without visible puddles.
How Can a Deteriorated Wax Ring Lead to Toilet Leaks at the Base?
A deteriorated wax ring loses its malleability and fails to seal the toilet base to the drain flange. Wax compression over years creates channels for sewage and water to escape at the floor. Base leaks often manifest as damp spots or odor and may damage subfloor structures if left unaddressed.
Can a Leaking Toilet Increase Your Water Bill & 5 Signs Your Toilet's Wax Ring Has a Problem
A leaking toilet can waste up to 200 gallons of water per day, often due to components like a worn flapper valve failing to create a proper seal. Furthermore, a deteriorated wax ring can compromise the watertight connection between the toilet and the floor drain, leading to visible signs such as water pooling, mold growth, sewage odors, and damp or spongy subfloors.
What Role Do Loose Tank Bolts and Gaskets Play in Toilet Leaks?
Loose tank bolts or worn gaskets allow water to seep from the tank-to-bowl joint. Vibration and temperature changes can loosen the bolts, breaking the gasket’s watertight seal. Leaks at this junction often drip into the bowl or out onto the floor, signaling immediate tightening or gasket replacement is needed.
How Do Cracked or Loose Water Supply Lines Cause Leaks?
Cracked or improperly seated supply lines develop small drips under pressure. Aged hoses and faulty ferrule connections weaken over time, leading to hairline fractures. Even minor drips at the base can steadily pool water on the floor, requiring hose replacement or retightening.
How Can You Diagnose a Leaking Toilet Effectively?
Effective diagnosis identifies the leak’s location and cause, guiding the correct repair. Visual, auditory, and dye-based tests help distinguish between tank, bowl, and base issues. Early detection prevents water waste and costly structural damage.
How to Perform the Food Coloring Test to Find Silent Toilet Leaks?

Add a few drops of food coloring into the tank, wait 15 minutes without flushing, and check the bowl. Colored water in the bowl indicates a seal failure, most often a worn flapper valve. This quick, tool-free diagnostic confirms silent leaks and directs your repair focus.
What Are the Visual and Auditory Signs of Toilet Leaks?
Listen for running water sounds after the flush cycle and inspect under the tank for dripping. Puddles around the base, corrosion on bolts, and continuous fill-valve cycling are key indicators. Recognising these signs early confines the leak before major damage occurs.
When Should You Use Professional Leak Detection Tools?
Advanced leak detection tools such as pressure gauges and electronic acoustic sensors are ideal when DIY methods yield inconclusive results. Professionals employ these instruments to pinpoint hidden cracks or underground flange issues. Engaging experts for complex diagnostics ensures accurate identification and efficient repair.
How to Identify If the Leak Is from the Tank, Bowl, or Base?
Observe where water accumulates: inside the bowl for tank leaks, around the base for wax ring failures, or above the floor for supply line drips. Shine a flashlight under the tank to see drips near bolts or gasket. Differentiating leak zones streamlines repairs by targeting the specific component at fault.
How to Fix a Running Toilet: Step-by-Step Flapper Valve Replacement Guide
Replacing a flapper valve seals the flush valve seat anew, stopping continuous leaks and phantom flushes. This quick fix restores tank integrity in most household toilets.
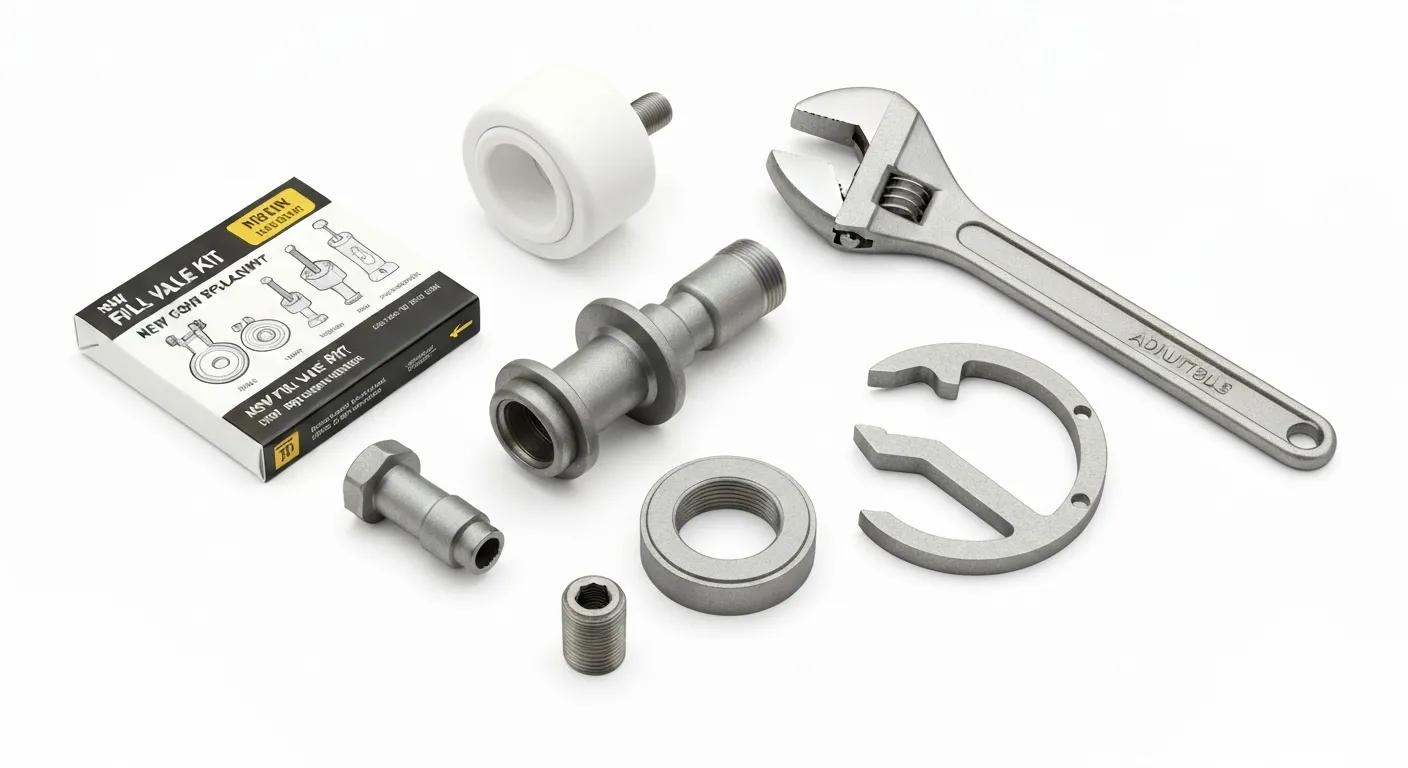
What Tools and Materials Are Needed to Replace a Toilet Flapper Valve?
Before you begin, gather:
- Adjustable wrench and slip-joint pliers
- New compatible flapper (2-inch or 3-inch)
- Clean cloth for wiping debris
Preparation prevents mid-job interruptions and ensures a smooth replacement process.
How to Remove and Inspect the Old Flapper Valve?
Turn off the water supply, flush to drain the tank, and detach the chain from the flush lever. Unhook the flapper from the pegs on the overflow tube and inspect for cracks or deformation. Assessing the old part confirms if additional valve or seal components require replacement.
How to Install a New Flapper Valve Correctly?
Fit the new flapper onto the overflow tube pegs, reconnect the chain with slight slack, and ensure even seating around the valve seat. Turn the water supply back on, let the tank refill, and test for leaks by observing the flush cycle. Proper alignment and chain length are key for a watertight seal and dependable operation.
When Should You Call a Plumber for Flapper Valve Issues?
If adjusting the chain and seating doesn’t stop the leak, internal tank components may be corroded or misaligned. Persistent leaks despite new parts indicate possible tank cracks or improper valve installation. In these scenarios, professional intervention safeguards against further water damage.
How to Prevent Future Flapper Valve Leaks?
Perform biannual inspections of rubber components for stiffness or tears. Clean the valve seat of mineral buildup with a clean cloth to maintain a perfect seal. Periodic checks ensure flapper longevity and uninterrupted toilet performance.
What Are the Best Methods to Repair or Replace a Toilet Fill Valve?
A properly functioning fill valve refills the tank then completely shuts off, preventing water waste. Repairs range from simple adjustment to full replacement based on valve condition.
How to Adjust a Fill Valve to Stop Constant Running?
Locate the adjustment screw or clip on the fill valve assembly and raise the float slightly to shut off water flow sooner. Test by flushing and watching the water level; fine-tune until the refill stops just below the overflow tube. This quick adjustment halts minor overfilling without replacing parts.
When Is Fill Valve Replacement Necessary?
Replace the fill valve when internal seals leak, float mechanisms fail, or corrosion prevents adjustment. Persistent cycling after multiple adjustments signals end-of-life for the valve assembly. A full replacement ensures reliable tank refill and lasting leak prevention.
What Are the Steps to Replace a Toilet Fill Valve Safely?
- Shut off the water supply and drain the tank completely.
- Disconnect the supply line beneath the tank using an adjustable wrench.
- Remove the old fill valve locknut and lift out the assembly.
- Insert the new fill valve, secure with the locknut, and reconnect the supply line.
- Adjust float height, turn on water, and test for proper shut-off.
Following these steps restores correct tank fill functionality.
Which Tools and Parts Are Required for Fill Valve Repair?
Necessary items include:
- New fill valve kit compatible with your toilet model
- Adjustable wrench or basin wrench
- Teflon tape for threaded connections
Having quality parts and tools ready streamlines the replacement process.
How to Maintain Your Fill Valve to Avoid Future Leaks?
Inspect fill valve for calcification or mineral deposits every six months and clean gently to preserve seal integrity. Verify float movement is unobstructed by debris or worn guide rods. Regular maintenance prevents valve sticking and water overflow incidents.
How to Repair Toilet Leaks at the Base: Wax Ring and Supply Line Solutions
Base leaks compromise flooring and subfloor integrity. Addressing wax ring or supply line failures restores a watertight seal between toilet and plumbing connection.
How to Identify a Wax Ring Leak vs. a Flange Problem?
A wax ring leak presents as damp flooring or grout cracks around the bowl base, often with an odor. A damaged flange may cause toilet wobble or rocking before any water escape. Determining the true source guides whether to replace the wax ring alone or repair the flange assembly.
What Is the Step-by-Step Process to Replace a Toilet Wax Ring?
- Turn off water, disconnect supply line, and empty tank and bowl.
- Remove tank bolts, lift off the tank, then unbolt the bowl and lift it free.
- Scrape off the old wax ring with a putty knife and clean the flange surface.
- Place a new wax ring on the flange, reset the bowl, and torque bolts evenly.
- Reinstall the tank, reconnect supply, and test for leaks.
This method re-establishes a reliable seal under the toilet base.
How to Fix or Replace a Leaking Water Supply Line Connection?
Shut off water and relieve pressure by flushing. Use an adjustable wrench to disconnect the hose from the shut-off valve and tank inlet. Inspect ferrules and replace the supply hose or apply new plumber’s tape to threaded connections before reassembly.
When Should You Call a Professional for Base Leak Repairs?
If the flange is corroded or set below floor level, professional flange repair or extension may be needed. Complex drain pipe configurations and damaged subflooring require expert evaluation. Calling Mitchel Plumbing and Gas ensures safe flange stabilisation and a durable base seal.
How to Prevent Toilet Base Leaks with Regular Maintenance?
Tighten bowl bolts every six months to maintain flange compression on the wax ring. Check for floor-level moisture and odors around the base. Periodic inspections catch seal deterioration early, preventing major repairs.
What Is the Average Cost to Fix a Leaking Toilet and How to Budget Repairs?
Repair costs vary by component complexity, part prices, and labor rates. Understanding typical expenses helps homeowners budget for DIY or professional services and avoid surprise invoices.
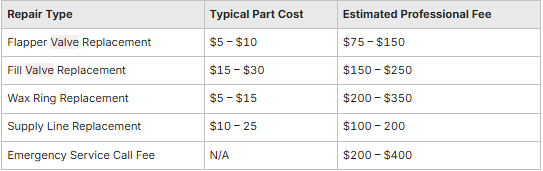
Average DIY repairs cost under $50 in parts, while professional interventions range from $150 to $350. Knowing these figures lets you weigh DIY savings against the value of guaranteed workmanship.
How Much Does It Cost to Replace a Flapper Valve?
Flapper valves retail for $5 to $10; professional installation adds $70 to $140 in labor. Rapid DIY fixes often pay back in weeks through water savings alone.
What Are Typical Costs for Fill Valve Replacement?
DIY kits run $15 to $30, while plumber rates of $75–$125 per hour bring total fees to $150–$250. Complex tank designs or vintage models may incur higher labor charges.
How Expensive Is Wax Ring Replacement or Base Leak Repair?
Wax rings cost under $15, but full bowl removal and reseating labor pushes total to $200–$350. Flange repairs or subfloor restoration can further increase costs.
What Are Plumber Hourly Rates and Emergency Service Fees?
Standard rates range from $75 to $125 per hour, with emergency call-outs often starting at $200. Off-hour or holiday services may carry surcharges of 25–50%.
How Can You Save Money with DIY Repairs vs. Hiring a Plumber?
Tackling simple fixes like flapper or fill valve replacement yourself saves part and labor costs. Allocate professional budgets for complex flange, base repair, or unclear leak sources. DIY savings can exceed $100 per repair, but incorrect fixes risk larger future expenses.
When Should You Call Mitchel Plumbing and Gas for Professional Toilet Leak Repairs?
Knowing when to seek expert help ensures safety, code compliance, and lasting solutions that was especially for complex or recurrent leaks. Mitchel Plumbing and Gas delivers emergency response, transparent pricing, and skilled workmanship to protect your home.
What Are the Signs That Require Expert Plumbing Assistance?
Cracks in the porcelain tank or bowl, persistent leaks after DIY attempts, or structural floor damage demand professional intervention. High-pressure fissures or corroded flange systems also exceed typical DIY scope. Expert diagnostics prevent hidden failures and water damage escalation.
How Does Mitchel Plumbing and Gas Provide Emergency Toilet Leak Services?
Our 24/7 hotline connects you with certified plumbers ready to dispatch within hours. We use advanced leak detection tools like acoustic sensors and pressure gauges to locate concealed failures. Rapid response curtails water loss and stabilises plumbing integrity immediately.
What Are the Benefits of Choosing Local Plumbing Experts?
Local technicians offer faster arrival times and community-driven accountability. We understand regional code requirements, common installation pitfalls, and supply sources for replacement parts. Supporting local businesses fosters better communication and trust.
How to Schedule a Toilet Leak Repair Service with Mitchel Plumbing and Gas?
Call our dedicated service number or book online via our user-friendly portal. Provide your location, leak symptoms, and urgency for an accurate service estimate. We send ETA notifications and upfront quotes so you’re never surprised.
How Does Professional Repair Help Save Water and Reduce Bills?
By correctly sealing leaks at the source, certified repairs prevent up to 200 gallons of daily water waste. Our precision services preserve plumbing lifespans and avoid recurring service calls. Investing in professional quality reduces your utility expenses and environmental impact.
How to Prevent Toilet Leaks: Maintenance Tips to Extend Your Toilet’s Lifespan
Routine maintenance preserves seals, prevents wear-out, and stops small issues from evolving into major leaks. These checks empower homeowners to maintain efficient, leak-free toilets year-round.
What Routine Checks Can Homeowners Perform to Avoid Leaks?
Inspect flapper and fill valve function by observing a complete flush cycle monthly. Check bowl base for moisture and odor and tighten bolts if you detect wobble. Early detection of minor issues prevents large-scale repairs.
How Does Regular Flapper and Fill Valve Inspection Help?
Examining rubber seals for stiffness or cracks ensures they remain elastic and watertight. Cleaning mineral buildup around valve seats maintains proper sealing. Consistent care avoids phantom flushes and silent water loss.
Why Is Timely Replacement of Worn Parts Important?
Aging components fail unpredictably, leading to sudden leaks and potential flooding. Replacing parts at first sign of wear costs a fraction of a full emergency repair. Proactive swaps maintain reliability and peace of mind.
How Can WaterSense Toilets Reduce Leak Risks and Save Water?
WaterSense-rated models use advanced fill and flush mechanisms to optimise water use. They often incorporate durable components that resist corrosion and seal degradation. Upgrading to WaterSense toilets can cut consumption by 20–60%, saving thousands of gallons annually.
What Are Expert Tips from Mitchel Plumbing and Gas for Leak Prevention?
Always use quality OEM or certified replacement parts; generic seals may fit poorly. Apply plumber’s grease sparingly to rubber to preserve flexibility and seal life. Schedule annual plumbing inspections to catch developing issues before they leak.
Regular inspection and prompt repair of toilet components safeguard both your home’s structure and your wallet. By following these expert tips from Mitchel Plumbing and Gas, you’ll resolve existing leaks, prevent future water waste, and maintain reliable toilet performance. Professional diagnostics and repair services ensure lasting solutions when DIY methods reach their limit. Proactive care today leads to leak-free comfort and significant savings on tomorrow’s bills.
Recent Post

Are heat pump hot water systems noisy
November 7, 2023
Mitchel Plumbing Gas
When considering the installation of a heat pump hot water system in your Brisbane home, one question that often surfaces is: Are these systems noisy? It's a valid concern for homeowners and one that Mitchell Plumbing and Gas takes seriously, as the comfort of your home environment is paramount. In this article, we'll explore the noise levels of heat pump hot water systems, factors that influence these levels, and how they compare to traditional water heating solutions.

Will a Dehumidifier Dry Out Damp Walls in Brisbane Homes?
October 4, 2022
Mitchel Plumbing Gas
It's not often that you hear the words "dehumidifier" and "plumbing" in the same sentence, but in this case, they go together like bacon and eggs.

DOES FLUSHING THE TOILET COST MONEY?
January 11, 2023
Mitchel Plumbing Gas
A single flush costs just a fraction of a cent, so unless you're someone that makes a habit out of flushing the toilet on repeat, then there won't be much of an impact on your water bill.
Get a Quote


.svg)